

Are you looking for educational – but fun – activities that teach history? When you mention HISTORY to your kids…do their eyes glaze over? What about combining historical events, STEM (via baking skills), hand-eye coordination, creativity, and learning?
How is this possible, you may ask? Teach history with gingerbread! See our free gingerbread and icing recipes, cookie templates, shopping lists, and instructions.
We love ancient history. We both took the class in high school. Chariots, archers on horseback, moats, archeology, ancient languages…hidden treasure!
But, we realize that not all kids are so interested in history. So, we had a bunch over and were able to teach history with enthusiasm by involving them in building a historic event from gingerbread…and it was a huge success.
What city did we use to teach history but make it fun?
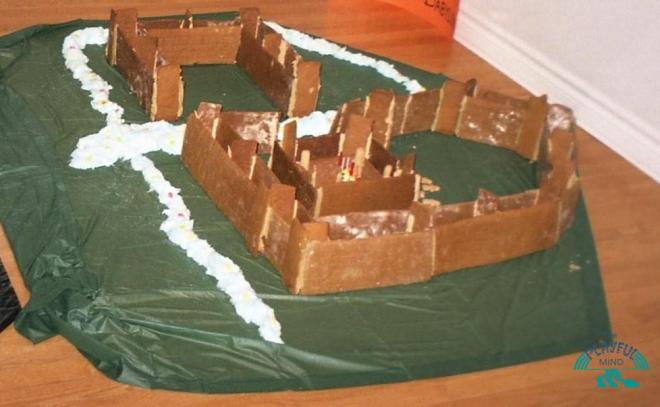
Making History Fun: Ancient Babylon in Gingerbread
We tried to make history fun by creating the historical city of Babylon with gingerbread and destroying it. What kid will say no to eating the delicious ruins?!
We took the kids through a brief journey of its history while they constructed it and then through the fateful night when it fell to the Medes and the Persians (they loved this part).
The kids had a blast, and afterward, parents told us they were definitely more interested in history!
Then sent the hyped-up sugared kids home to their parents. And then cleaned up. Our floors needed a few washes (edible glitter…yep, it gets everywhere), but it was fun!


Construction List
At the bottom of this page are separate lists and instructions per item and one list with all ingredients on a complete shopping list.

The free recipe is below, using meringue powder instead of raw eggs. An example of meringue powder is a well-known brand Wilton

Decorating Icing dries non-tacky (Crusting Buttercream, free recipe below in Resources)
Gingerbread Construction Cookie Recipe (Note: this isn’t the same as a normal cookie recipe. Free recipe below in Resources)
Depending on the scale, make a single batch, double it – or be unwise like us and make cookie dough until you can’t take it anymore. This level of cookie dough making may make it into your dreams…

Thickness Guide & Rolling Pin: These rolling pin thickness sets are handy to help you learn how to roll even thicknesses (and correct thicknesses!)
City Plan (or free shapes. See the guide below in Resources)
You can easily cut your own or buy a cookie-cutter kit and use the preferred pieces.

Squeeze bottles will make construction easier, so try a squeeze bottle for the Cement Icing (Royal Icing). Different bottle sizes are helpful if making small batch colors for cookies, too (to use with buttercream icing, for example).
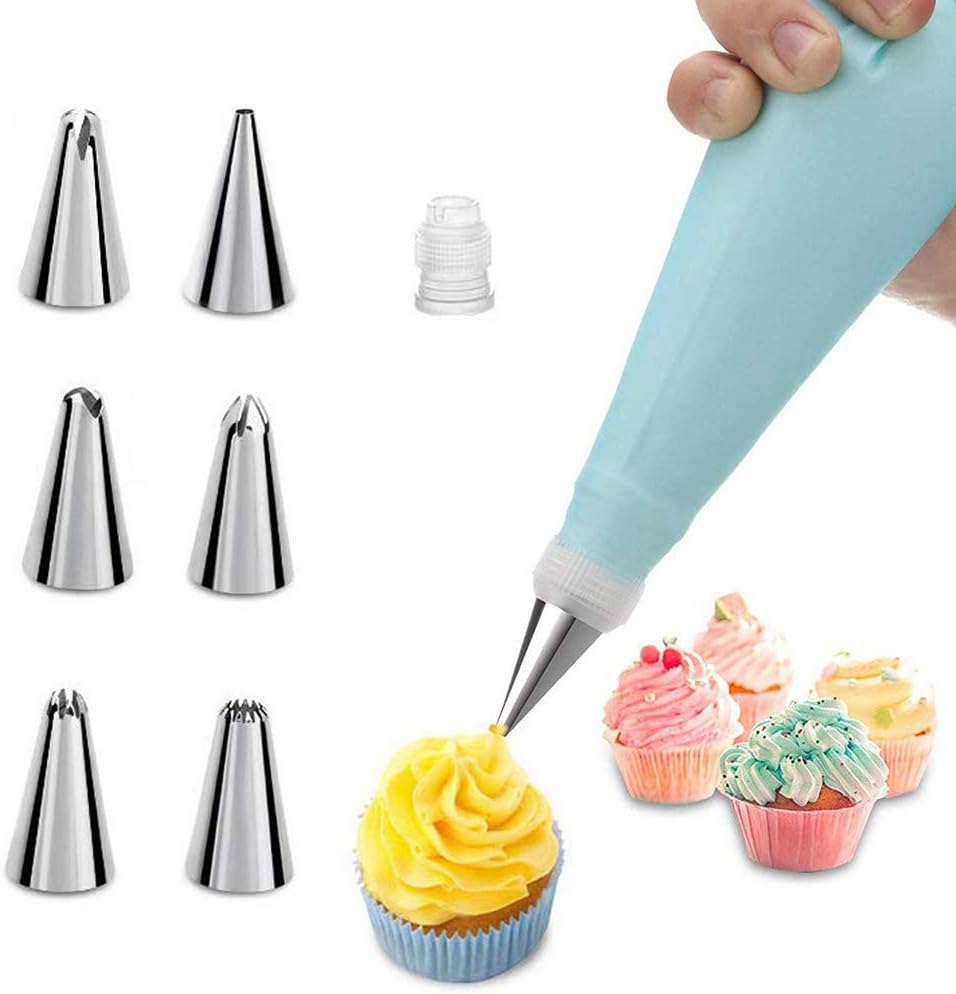
Piping bags with different tips make decorating more fun. You could buy a piping bag with the Decorating Icing (Crusting Buttercream).

Mini gingerbread people cookie cutters for the action figures. This one comes with three sizes.

Parchment paper, for example, this one from If You Care

Decorations (see suggestion list in Resources)
Food dye, if you desire
Tips
Make-Ahead
Gingerbread Dough Recipe: Dough can be made up to 3 days before and tightly wrapped in the fridge. Baked and cooled cookies can be stored in an airtight container for up to 7 days or frozen for 2-3 months.
Crusting Buttercream (Decorating Icing): Can be made 1-2 days before and kept in the fridge in an airtight container. This can also be frozen for up to 2 months. Just thaw and whisk before use (before putting it in a squeeze bottle or piping bag).
Royal Icing (The Cement): Can be made three days before and kept in the fridge in an airtight container. It can also be frozen for up to 2 months. Just bring it to room temperature and whisk before use (it can then be put in a squeeze bottle or piping bag).
A Regular Gingerbread Cookie Recipe is Too Soft
A regular gingerbread cookie recipe will be too soft. You can use the recipe we included in the download or use one you have and adjust it:
- Decrease the baking soda a little so the cookies don’t rise as much. This will make them sturdier
- Decrease the butter and molasses so the dough is not as soft
Chill the Dough Before Rolling
Divide the dough into two balls before chilling. This will keep the other half from getting too warm while you roll out the first ball.
Don’t skip chilling, or the shapes will not hold. Chill for 2 hours or up to 3 days
Rolling the Dough
Roll out the dough between two parchment sheets; it’s way easier.
We LOVE bench scrapers, such as this one by OXO. They help lift off the dough and keep its shape, and if you don’t have parchment, it is a miracle worker (plus, you can scrape off the leftover dough without damaging your counter, which makes cleanup easier).
Leftover dough: roll back into a ball, chill, and re-use.
City Plan
Get your kids to research an event in history and a map of a city plan (or characters involved).
We laid out our city on paper (loosely designed, aiming for reasonable accuracy…this is gingerbread, after all).
We mostly made various sizes of basic shapes, like rectangles, squares, triangles, and circles, and used them to build. You can always cut up pieces to suit your design as you build.
Baking Time
We cooked the pieces a little longer than usual so they were a little harder so they wouldn’t crumble while being built, but not so hard they cracked teeth.
Setting Before Decorating
Let your house set for about 5 hours before decorating. We made ours the night before.
Icing and Decorating
Keep some frosting on hand when decorating in case of falling walls during the enthusiasm. Although – that would be a good time to teach about disaster relief.
Use “Cement” or royal icing for building and buttercream for decorating.


Additional Ideas For Teaching History
If your kids want to go all out, use tin foil to make crowns and armor or whatever historical items are associated with your gingerbread event, as seen in the photos above.
Or, even more involved, you can make masks, armor, and helmets out of paper Mache.
For more information, see Paper Mache Crafts for Kids: Masks, Armor, Animals & More.
 Print This Post
resources
Here are some free downloads for you to help you teach history with your own project!
The recipes are kid-friendly, meaning there are pictures and some basic baking tips to learn. However, we still recommend adult supervision.

The Big Sis